Setting up a reverse proxy on your Synology NAS can dramatically improve how you access your Docker containers. Instead of remembering ports for each service, you can use clean subdomains like plex.yourdomain.com or radarr.yourdomain.com.
What’s Caddy?
Caddy is a modern, open-source web server that excels at reverse proxying. It’s lightweight, easy to configure, and handles HTTPS automatically. What sets it apart is its human-readable configuration format and automatic certificate management capabilities.
Why I Chose Caddy Over Synology’s Built-in Solution
Synology does include a reverse proxy feature, but it has some limitations:
Platform Agnostic: Caddy runs in Docker, which means it’s not tied to Synology’s ecosystem. If I ever migrate to a different NAS or server setup, my configuration comes with me.
File-Based Configuration: This is the big one for me. Synology’s reverse proxy requires you to configure each service through their GUI interface. When you’re running more than a few containers, this becomes time-consuming. With Caddy, I can define all my services in a single configuration file that’s easy to version control and backup.
Better HTTPS Handling: Caddy’s automatic HTTPS capabilities are far superior to what Synology offers out of the box. We won’t use those, but I listed it for completeness’ sake.
Goals
Access your Docker containers using clean subdomains instead of remembering port numbers. Instead of typing 192.168.1.100:9696 to reach Prowlarr, you’ll use prowlarr.yourdomain.com.
Prerequisites
Before we dive in, you’ll need a few things in place:
Docker Setup: I’m assuming you have Docker set up and running using the Trash Guides. This isn’t strictly required, but I’ll assume your directory structure and permissions match what’s described in their guide.
Cloudflare Domain Management: This guide assumes your domain is managed through Cloudflare’s dashboard. The DNS records must have the proxy status enabled (orange cloud icon). This is crucial for the HTTPS setup we’ll implement later.
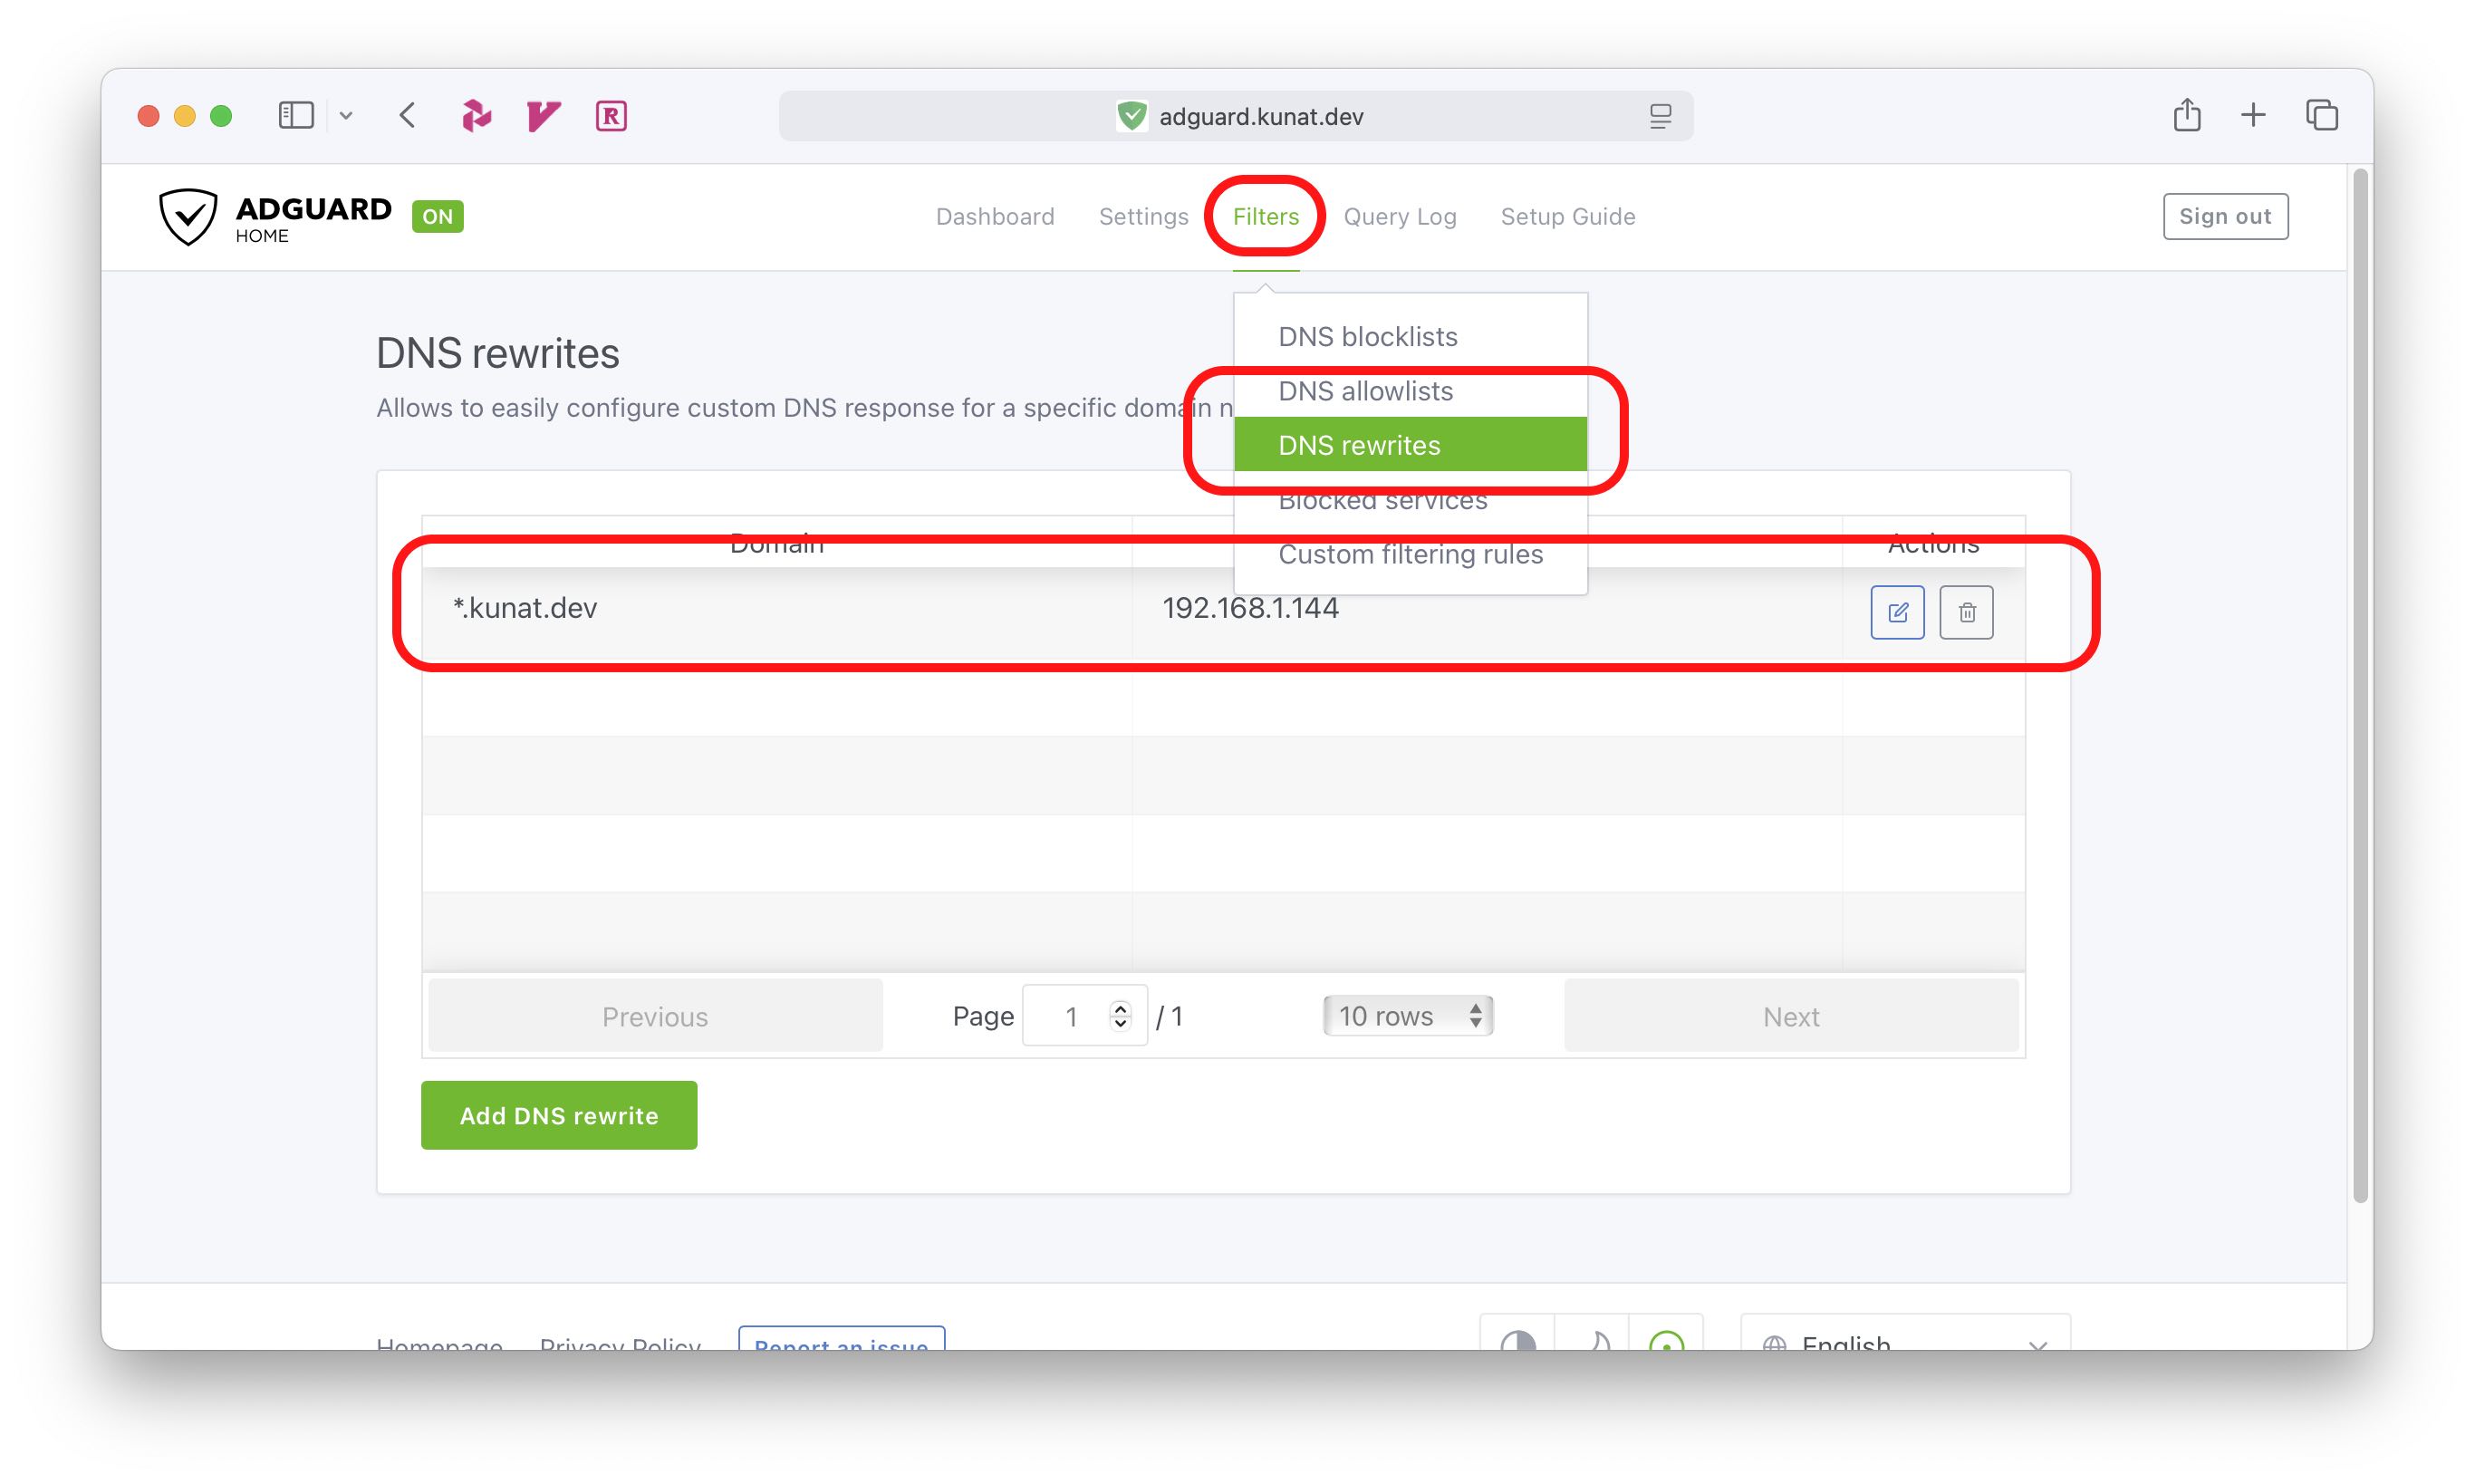
Local DNS Server: You’ll need to be running your own DNS server like AdGuard Home or Pi-hole. This is required to add a wildcard DNS rewrite rule that points *.yourdomain.com to your Synology’s IP address.
Setup
Adding Caddy to Your Docker Compose
First, let’s add Caddy to your existing docker-compose.yml file. Here’s the configuration I use:
  caddy:
    container_name: caddy
    image: caddy:latest
    restart: unless-stopped
    network_mode: host
    environment:
      - TZ=${TZ}
    volumes:
      - /volume1/docker/appdata/caddy/Caddyfile:/etc/caddy/Caddyfile:ro
      - /volume1/docker/appdata/caddy/data:/data
      - /volume1/docker/appdata/caddy/config:/config
      - /volume1/docker/appdata/caddy/certs:/caddy/certs:ro
Creating the Folder Structure
In your appdata directory (/volume1/docker/appdata), create the necessary Caddy directories:
mkdir -p caddy/{certs,config,data} && touch caddy/Caddyfile
This creates the directory structure that Caddy needs, including directories for certificates, configuration, and data storage, plus the main Caddyfile.
Freeing Up Ports 443 and 80
Here’s something that caught me off guard: Synology automatically binds to ports 443 and 80 even if you’re not using their built-in reverse proxy. Since Caddy needs these ports to handle HTTPS and HTTP traffic, we need to free them up.
sed -i -e 's/80/82/' -e 's/443/444/' /usr/syno/share/nginx/server.mustache /usr/syno/share/nginx/DSM.mustache /usr/syno/share/nginx/WWWService.mustache

synosystemctl restart nginx
I set up a boot script to handle this automatically on each reboot (Control Panel -> Task Scheduler). While I’ve found that this override typically persists between reboots, there’s no harm in ensuring it runs at startup. System updates might reset these settings to their defaults, and I’d rather be safe than sorry.

Setting Up HTTPS (Optional but Recommended)
HTTPS isn’t technically required for local-only access, but it eliminates browser warnings. However, there’s an important caveat with Caddy’s automatic HTTPS feature.

Why Caddy’s Built-in Auto HTTPS Won’t Work: Caddy’s automatic HTTPS uses Let’s Encrypt, which requires ACME challenges to verify domain ownership. These challenges need your server to be accessible from the internet. If your containers are only accessible through Tailscale or similar private networks (like mine), the ACME validation will fail.
The Solution: Cloudflare Origin CA Certificates: Since I use Tailscale to access my containers outside my home network, I opted for Cloudflare’s Origin CA certificates. These certificates are valid for 15 years and don’t require internet accessibility for validation.
Generating Cloudflare Origin Certificates
Your domain needs to be using Cloudflare for this to work. Navigate to the Cloudflare Origin CA dashboard and generate a wildcard certificate for your domain. See Cloudflare Docs for step-by-step instructions.
Save the public and private keys to these files:
cert.pem(public key)key.pem(private key)
Move both files to your caddy/certs directory.
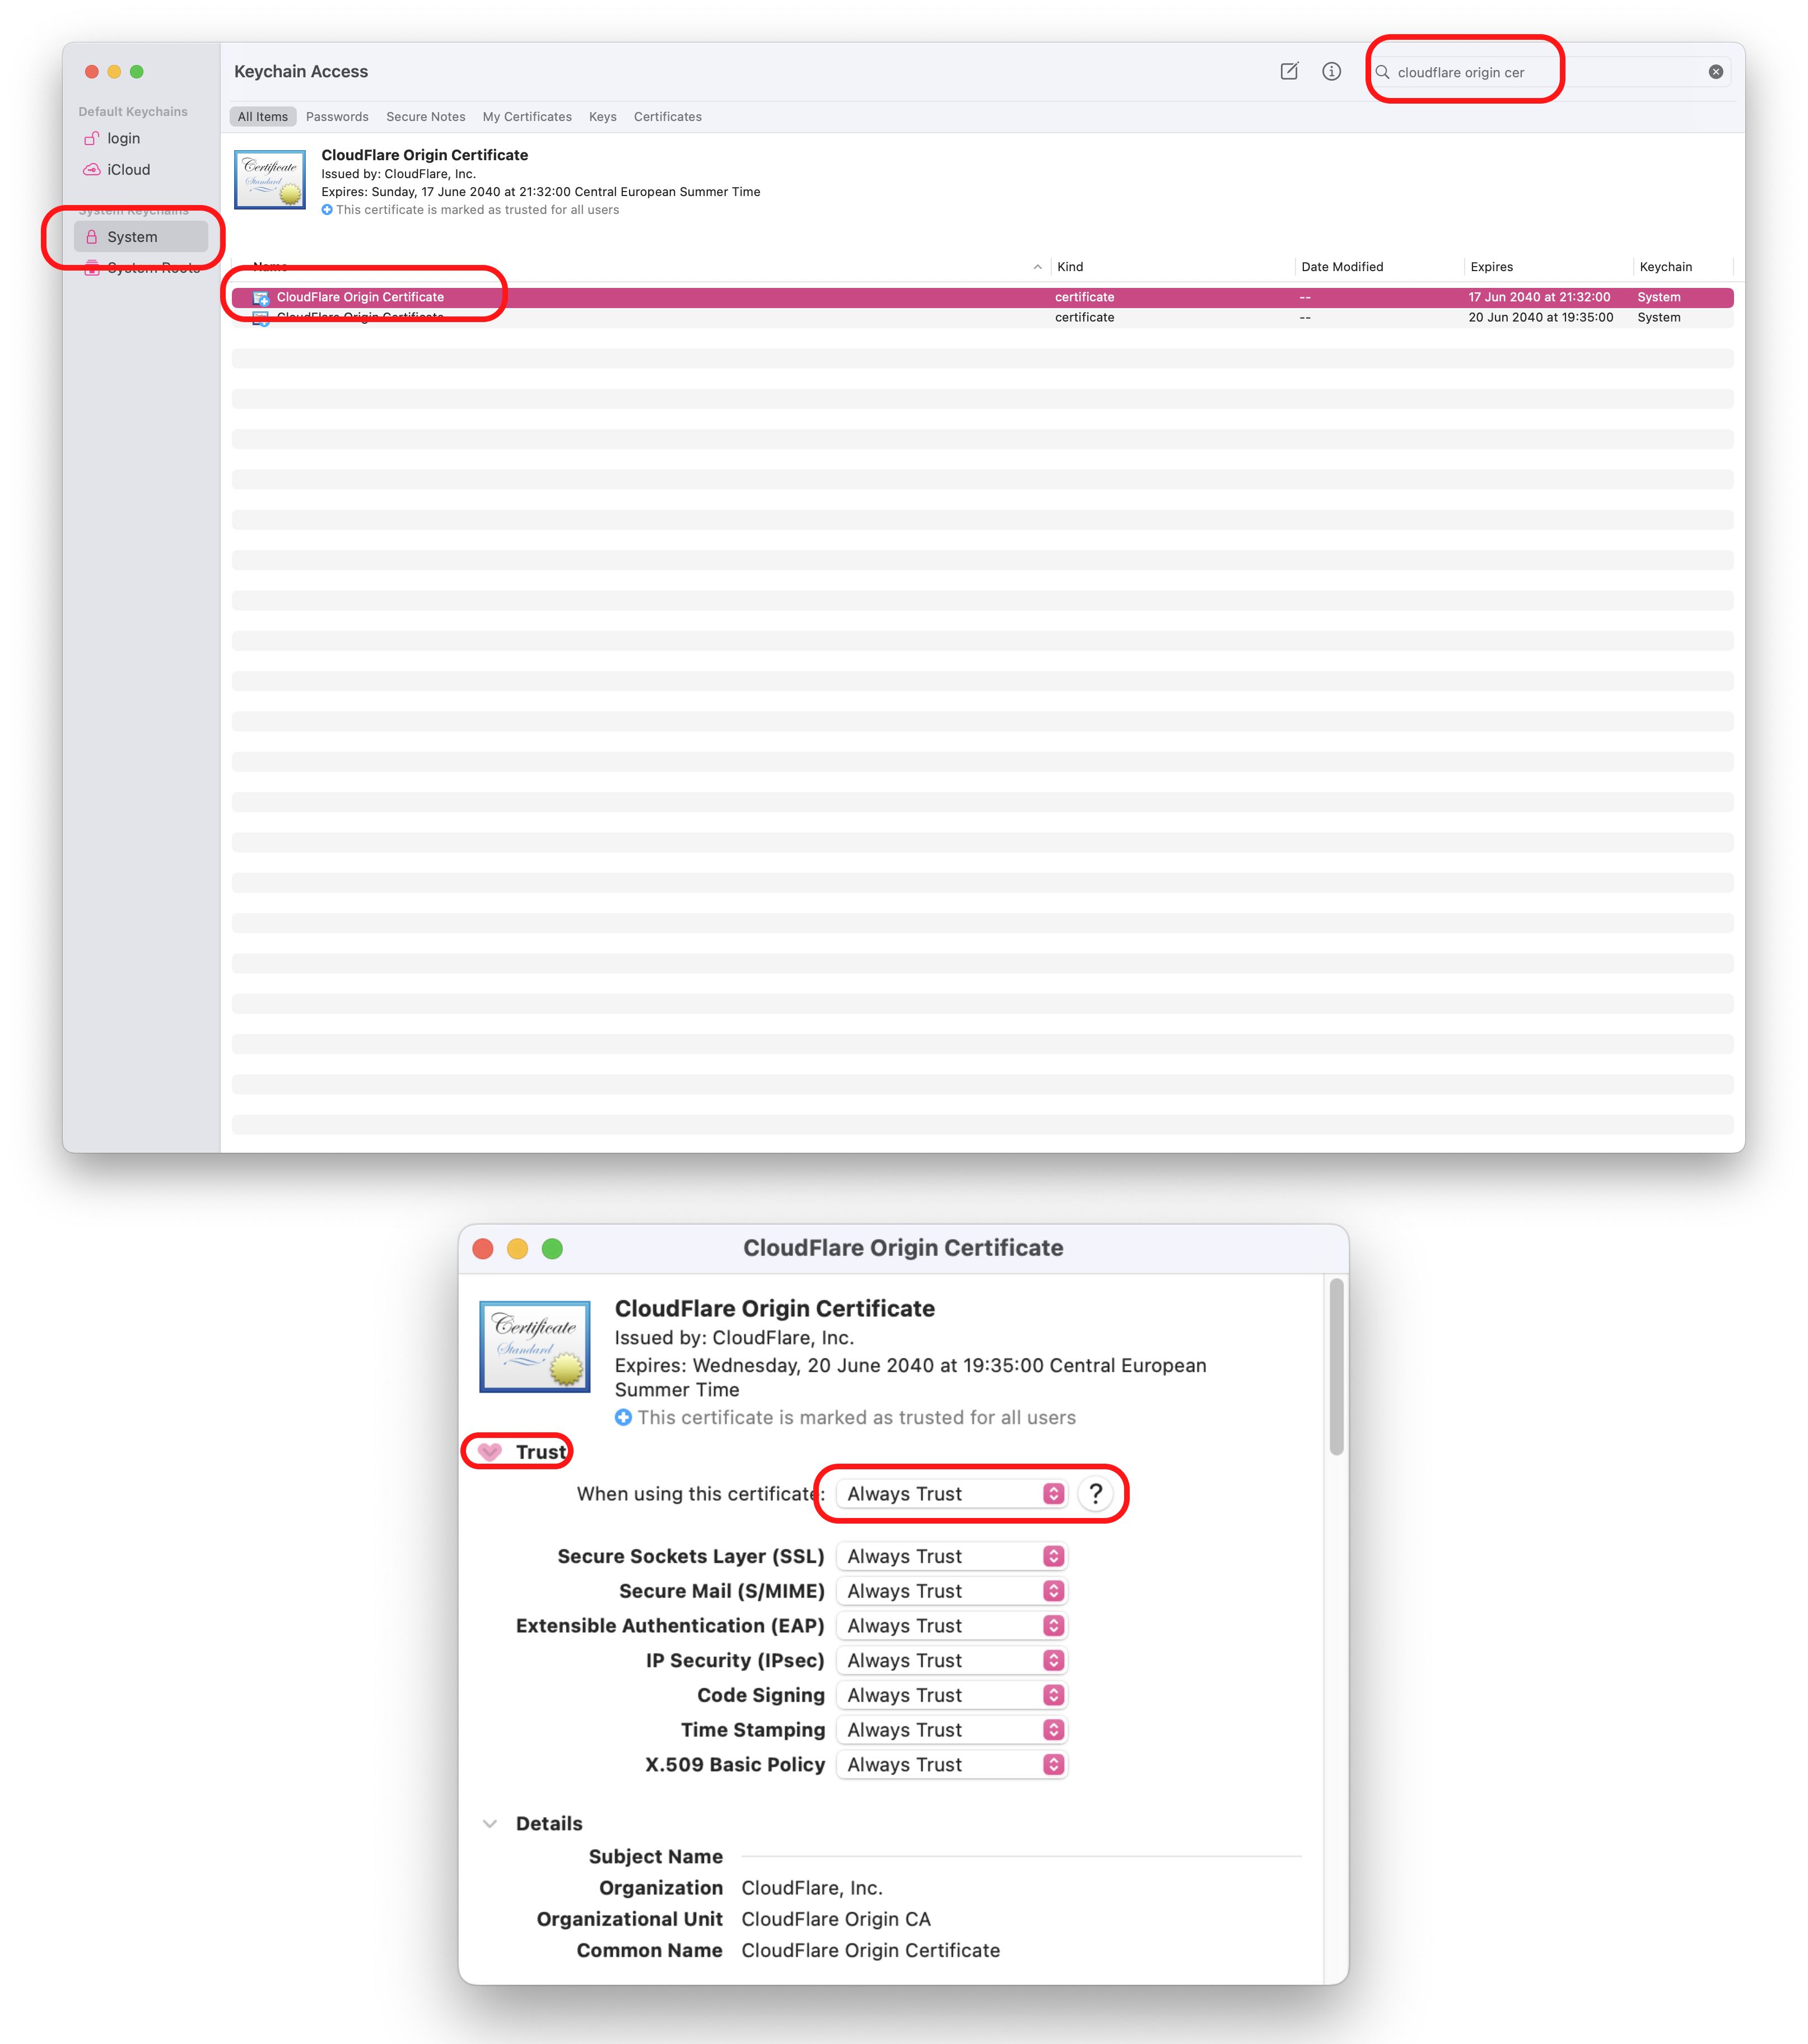
Adding the Certificate to Your Devices
To eliminate browser security warnings, you’ll need to add the public certificate (cert.pem) to your device’s trusted certificate store. On macOS, this means adding it to your keychain and marking it as trusted. You’ll need to repeat this process for each device you want to use to access your containers.
Setting Proper Permissions
Following the Trash Guides approach, set the correct permissions for the docker user:
sudo chown -R docker:users /volume1/docker/appdata/caddy
sudo chmod -R a=,a+rX,u+w,g+w /volume1/docker/appdata/caddy
Configuring the Caddyfile
Here’s a sample Caddyfile configuration. This is where the magic happens:
# Global options
{
	# Disable automatic HTTPS since we're using Cloudflare Origin CA certs
	auto_https off
}

# Prowlarr
prowlarr.kunat.dev {
	reverse_proxy localhost:9696
	tls /caddy/certs/cert.pem /caddy/certs/key.pem
}

# Plex
plex.kunat.dev {
	reverse_proxy localhost:32400
	tls /caddy/certs/cert.pem /caddy/certs/key.pem
}

# AdGuard
adguard.kunat.dev {
	reverse_proxy localhost:3000
	tls /caddy/certs/cert.pem /caddy/certs/key.pem
}

# Synology Dashboard (HTTPS backend)
synology.kunat.dev {
	reverse_proxy https://localhost:5001 {
		transport http {
			tls_insecure_skip_verify
		}
	}
	tls /caddy/certs/cert.pem /caddy/certs/key.pem
}

# Homarr
homarr.kunat.dev {
	reverse_proxy localhost:7575
	tls /caddy/certs/cert.pem /caddy/certs/key.pem
}
Each service follows the same pattern: define the subdomain, specify the reverse proxy target (localhost:port), and point to our TLS certificates.
Running Caddy
Start Caddy with:
sudo docker-compose up -d caddy
If everything is configured correctly, you should see logs similar to these:
caddy  | {"level":"warn","ts":1752004979.244892,"msg":"failed to set GOMAXPROCS","error":"open /sys/fs/cgroup/cpu/cpu.cfs_quota_us: no such file or directory"}
caddy  | {"level":"info","ts":1752004979.2452004,"msg":"GOMEMLIMIT is updated","package":"github.com/KimMachineGun/automemlimit/memlimit","GOMEMLIMIT":18851998924,"previous":9223372036854775807}
caddy  | {"level":"info","ts":1752004979.2452545,"msg":"using config from file","file":"/etc/caddy/Caddyfile"}
caddy  | {"level":"info","ts":1752004979.247973,"msg":"adapted config to JSON","adapter":"caddyfile"}
caddy  | {"level":"info","ts":1752004979.2502022,"logger":"admin","msg":"admin endpoint started","address":"localhost:2019","enforce_origin":false,"origins":["//localhost:2019","//[::1]:2019","//127.0.0.1:2019"]}
caddy  | {"level":"info","ts":1752004979.2507207,"logger":"tls.cache.maintenance","msg":"started background certificate maintenance","cache":"0xc00079c480"}
caddy  | {"level":"warn","ts":1752004979.2785668,"logger":"tls","msg":"stapling OCSP","error":"no OCSP stapling for [cloudflare origin certificate *.kunat.dev]: no URL to issuing certificate"}
caddy  | {"level":"info","ts":1752004979.278835,"logger":"http.auto_https","msg":"automatic HTTPS is completely disabled for server","server_name":"srv0"}
caddy  | {"level":"info","ts":1752004979.2799113,"logger":"http","msg":"enabling HTTP/3 listener","addr":":443"}
caddy  | {"level":"info","ts":1752004979.2799726,"msg":"failed to sufficiently increase receive buffer size (was: 208 kiB, wanted: 7168 kiB, got: 416 kiB). See https://github.com/quic-go/quic-go/wiki/UDP-Buffer-Sizes for details."}
caddy  | {"level":"info","ts":1752004979.2800903,"logger":"http.log","msg":"server running","name":"srv0","protocols":["h1","h2","h3"]}
caddy  | {"level":"info","ts":1752004979.280308,"msg":"autosaved config (load with --resume flag)","file":"/config/caddy/autosave.json"}
caddy  | {"level":"info","ts":1752004979.2811198,"msg":"serving initial configuration"}
caddy  | {"level":"info","ts":1752004979.38889,"logger":"tls","msg":"finished cleaning storage units"}
The key things to look for are “server running” and “serving initial configuration” messages. These indicate that Caddy has successfully started and is ready to handle requests.
Now try accessing one of your Docker containers using its subdomain. If everything is working correctly, you should be able to reach your services through clean URLs like https://prowlarr.yourdomain.com.
Troubleshooting
Clean Your DNS Cache: If you’re having trouble accessing your services after setup, try clearing your DNS cache. On macOS, run:
sudo dscacheutil -flushcache; sudo killall -HUP mDNSResponder
Check Your Wildcard DNS: Make sure your local DNS server (AdGuard Home or Pi-hole) has the wildcard rewrite rule in place. Without *.yourdomain.com -> your_synology_ip, your subdomains won’t resolve locally.
Verify Certificate Trust: If you’re seeing browser security warnings, double-check that you’ve properly installed and trusted the Cloudflare Origin CA certificate on your client devices.
Resources
Conclusion
Setting up Caddy as a reverse proxy on Synology has been a game-changer for my homelab. The ability to access all my services through clean subdomains makes everything feel more professional and easier to remember. While the initial setup requires some work, especially with the certificate configuration, the long-term benefits are worth it.
Update 14/07/25: If you want to access your Docker containers using their LAN IP addresses consistently, regardless of whether we’re connected to our home network or accessing remotely through Tailscale check out this aritcle on Tailscale subnet routers.